

How To Install Custom Boot Animation Android
In this guide, we will show you the steps to change the boot animation on your Android device. To give information technology a personal touch, every OEM has its own distinguishable startup screen. While some similar to take the basic route, others add together a few customizations to the same. With that said, though it remains on your screen for only a few seconds, withal it is the first piece of content that you would be seeing after powering on your device. Well, as the popular saying goes, the first impression is indeed the last impression.
The aforementioned could be practical here as well. Imagine booting up the screen with hundreds of lines of codes in Matrix-style running continuously. Or incorporating the Linux logo to the startup screen would surely requite your device a tech geek look. All in all, at that place are a plethora of reasons why yous would want to change that dull, dull and monotonous boot animation on your Android device. So with that in mind, let'southward start off with this guide.
- How to Execute Android ADB Fastboot Commands Wirelessly
- Listing of Useful ADB and Fastboot Commands | Download Platform Tools
- How to Check and Modify Electric current Active Slot on Android
- Utilize ADB and Fastboot Commands on Android Without PC
How to Alter Boot Animation on Android Phones
The unabridged instructions take been listed out in separate sections for ease of understanding. Keep ahead in the verbal aforementioned sequence as mentioned. They might not be able to function forth the expected lines in Samsung Phones and in some heavily customized Android ROMs.
Furthermore, you lot are ready to try information technology out, and then make sure to take a fill-in beforehand. Droidwin and its members wouldn't be held responsible in case of a thermonuclear war, your warning doesn't wake you upward, or if anything happens to your device and data past performing the below steps.
STEP i: Root your Android Telephone
The commencement requirement to carry out this task is that you volition need a rooted device. This is considering the stock boot blitheness that we are going to modify is placed in the arrangement sectionalisation of your device. To access this partition, you would need administrative level privileges. And so earlier moving ahead, make sure to root your device via the following guides:
- How to Root Android Devices Without TWRP Recovery
- How to Root Android Devices via TWRP Recovery
- Root Android 11 via Magisk Patched boot.img (without TWRP)
- How to Root any MediaTek Device Using SP Flash Tool
Step two: Download the Custom Kick Animations
Side by side upwardly, you lot will take to take hold of hold of your preferred boot blitheness. For that, this XDA post (credit: XDA senior member mauam) might come in handy equally it has a plethora of boot animations (over 200!) spread beyond various domains. Information technology is definitely worth a checkout. Once yous accept got the desired boot animation, it's time to install it onto your Android device. Follow along.
Footstep three: Install a Root Supported File ExplorerApp
Now that yous have downloaded the desired boot animation, it needs to be placed within the organisation partition of your device. And for that, you will need a file explorer. The stock file managing director app installed on your device might not have the required root privileges.
Then you will have to download the one from Play Shop that comes with this feature. Every bit far as this guide is concerned, I am using the Solid Explorer File Director. You may try any of your preferred root explorers, just make certain that they have root capabilities.
STEP 4: Install Custom Boot Blitheness on Android
- To begin with, rename the downloaded file to bootanimation, hence the complete name volition be bootanimation.zip. Now transfer this file to your device.
- Launch the File Explorer app on your phone (in this guide, nosotros are using Solid Explorer, even so, the instruction will be near about the aforementioned for others as well).
- Now tap on the hamburger menu situated at the top left and select Root.
- You lot will now get a Magisk permission popup, tap Grant.
- Navigate to the post-obit location: arrangement > media.
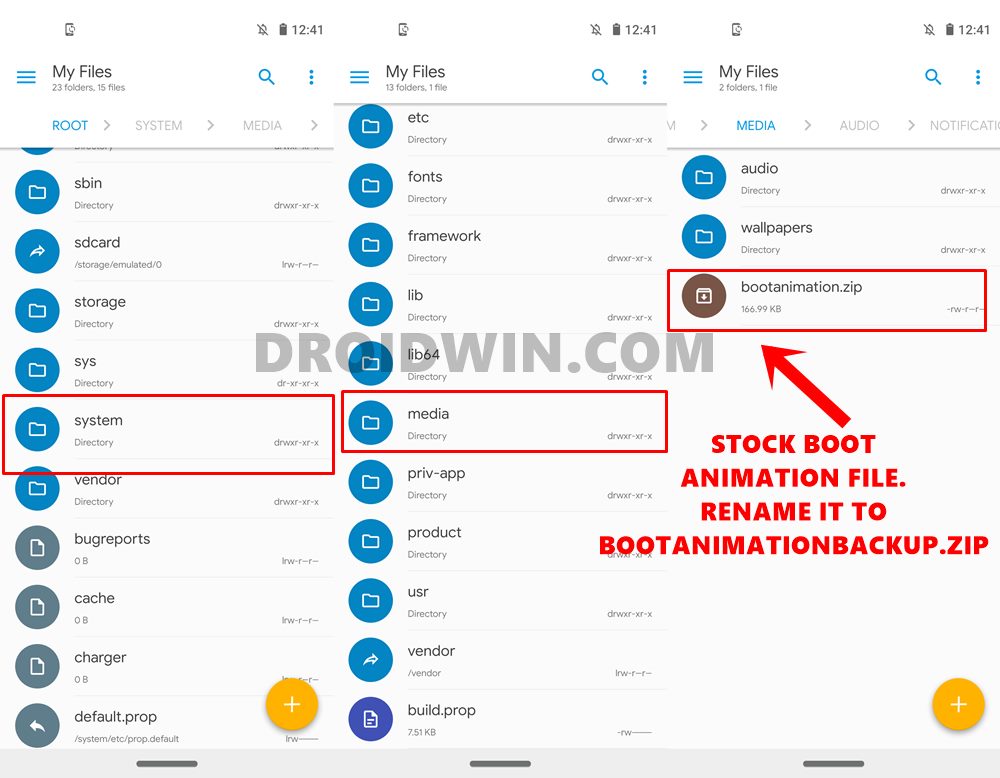
- Within that, yous volition already find the file bootanimation.goose egg. This is the original kicking blitheness provided by the OEM. As of now, don't delete it rather take its fill-in.
- For that, the best way is to rename it to something forth the lines of bootanimationbackup.goose egg.
- Now copy the custom boot animation file that you had named bootanimation.zip and transfer it to this directory (system > media).
- Now select this file and head over to its Backdrop section.

- Inside that, become to the Attributes tab and y'all need to requite it the Permissions- 666 (RW-R–R–). In other words,
- Owner: R, Westward
- Group: R
- Global: R
- In one case the required file permission has been set, salvage the changes by hit the Apply push.
- You lot may now reboot the device and enjoy the newly gear up custom boot animation
That'southward it. These were the steps to change the kick animation on your Android device. Do let us know your preferred boot animation that y'all ultimately ended up applying on your device. Talking virtually which, if you have whatsoever queries with the instructions, do let us know in the comments department beneath. Nosotros will get back to yous with a solution at the earliest. With that said, let'south at present turn our attention towards the next section.
- Ready adb server version doesn't match this client; killing.
- How to ready ADB Device non found [List of Devices Attached is blank]
- Detailed Steps to Fix adb is non recognized Error
- How to Fix Unauthorized Device with ADB Commands [3 methods]
How to Fix Bootloop after Changing Kick Blitheness
While the chances are extremely rare, but nosotros should never say never when information technology comes to custom developments and bootloops! So if your device ends upwards in a bootloop after changing the boot blitheness, and so in that location is quite an like shooting fish in a barrel way out to fix information technology. here is what needs to exist washed:
- To begin with, your device needs to have the TWRP Recovery installed. If that is not the case, and then refer to our detailed guide:How to Install TWRP Recovery on Android.
- Boot your device to TWRP Recovery. Once that is done, head over to Mount and enable Arrangement.

- At present that the organisation partition has been mounted, get to the Advanced section of TWRP.
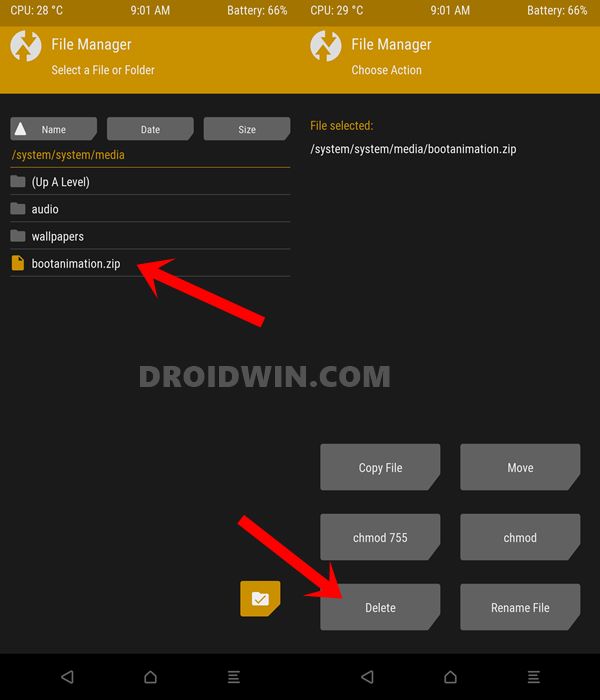
- Select the File Manager option and navigate to the post-obit directory:
System > System > Media

- Now select the bootanimation.nix file and tap on Delete. With this, you have deleted the custom boot animation file.
- So select the bootanimationbackup.zip file and tap on Rename File.
- Modify its name to bootanimation.zippo and perform a correct swipe to save it. This fashion you accept restored the original boot animation file.

- You may now reboot your device to the OS. For that, go to Reboot and tap Arrangement.
And then this was all from this guide on how to fix bootloop on whatsoever Android device later installing a custom boot blitheness. All the same, accept any queries? Driblet them in the comments below!
About Principal Editor
Source: https://www.droidwin.com/change-boot-animation-android/
Posted by: gurleygracts1948.blogspot.com
0 Response to "How To Install Custom Boot Animation Android"
Post a Comment